
In an ever-evolving landscape of public safety, drones have emerged as pivotal tools for efficient and effective responses. Whether it's mitigating wildfires, documenting natural disasters, or enhancing real-time pursuits, the integration of DJI Enterprise solutions offers unparalleled advantages.
Public Safety Pilots rely on drone data to make on-field decisions in very critical situations, understanding the features and capabilities of your drone fleet can be the difference between saving a life or a tragedy.
In this article, we will explore ten DJI Enterprise features to elevate your response strategy and Public Safety Drone Operations:
PinPoint and Location-Sharing
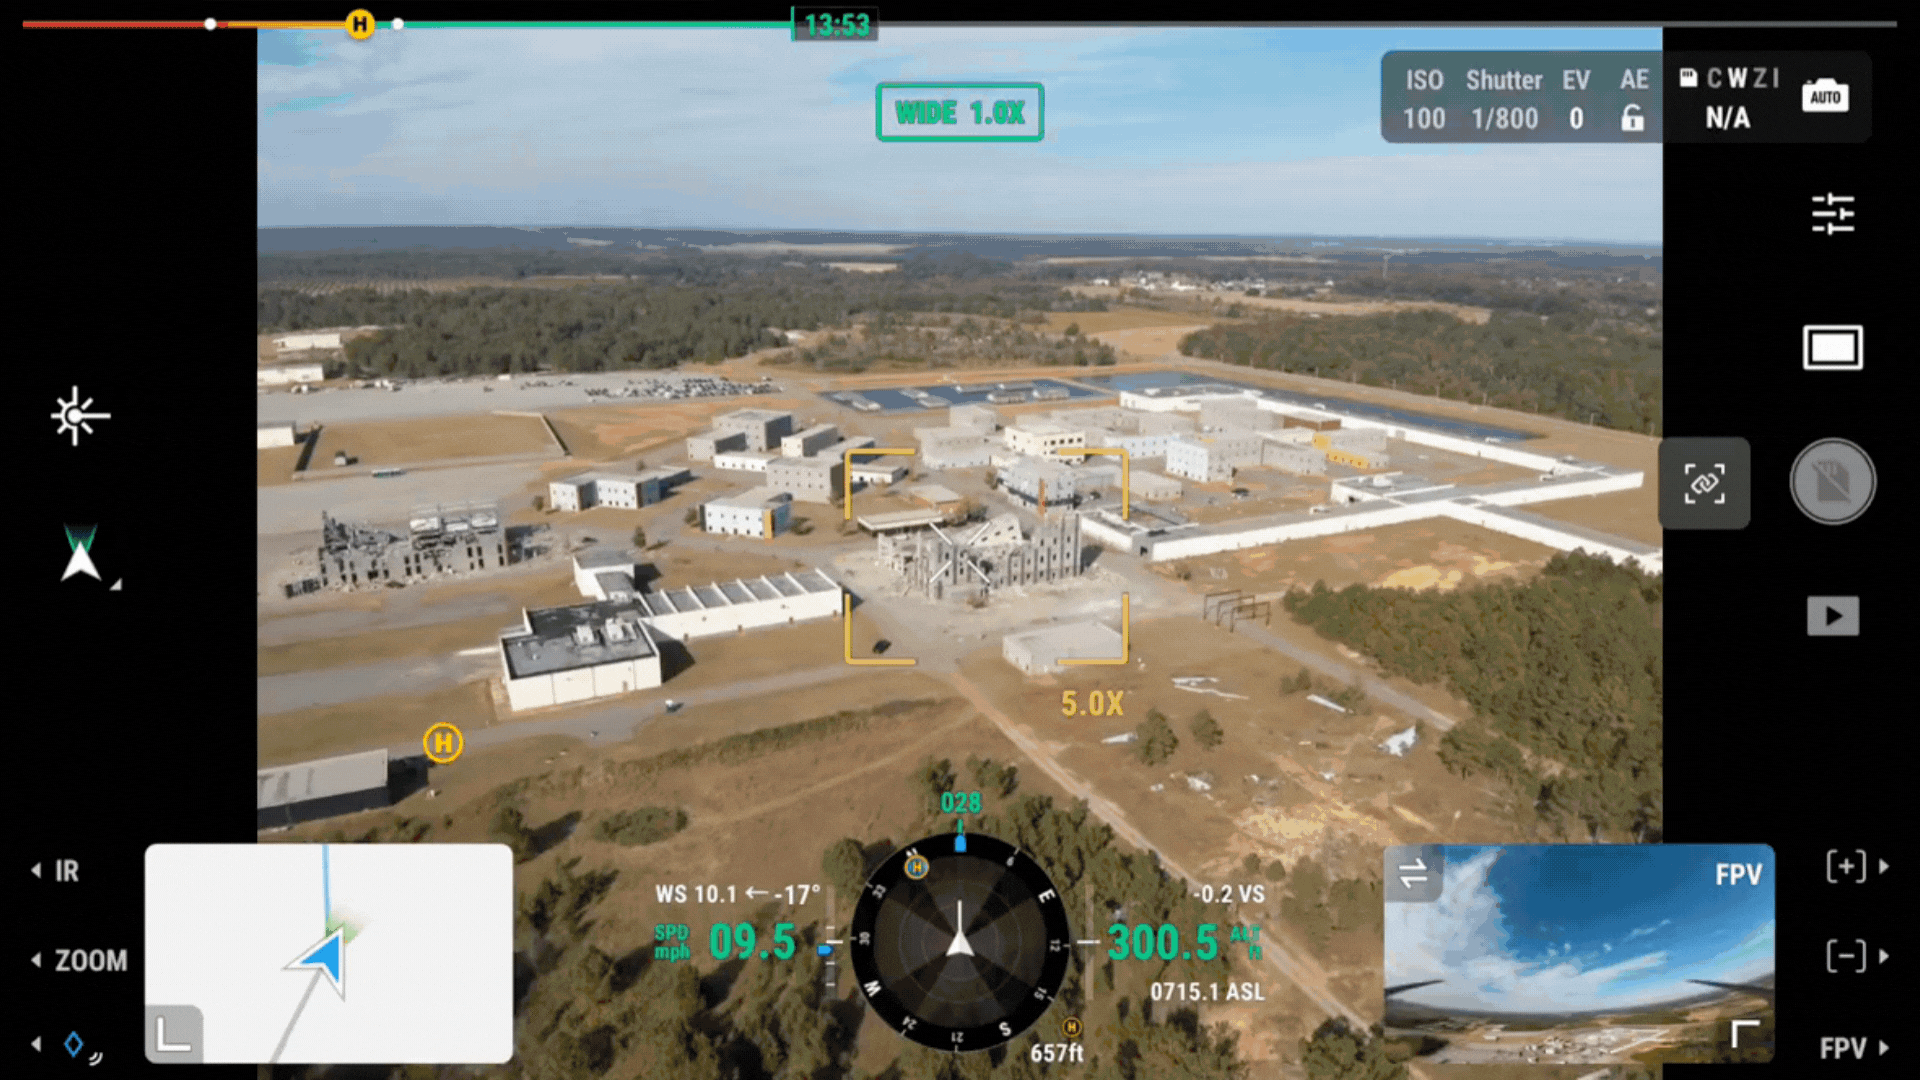
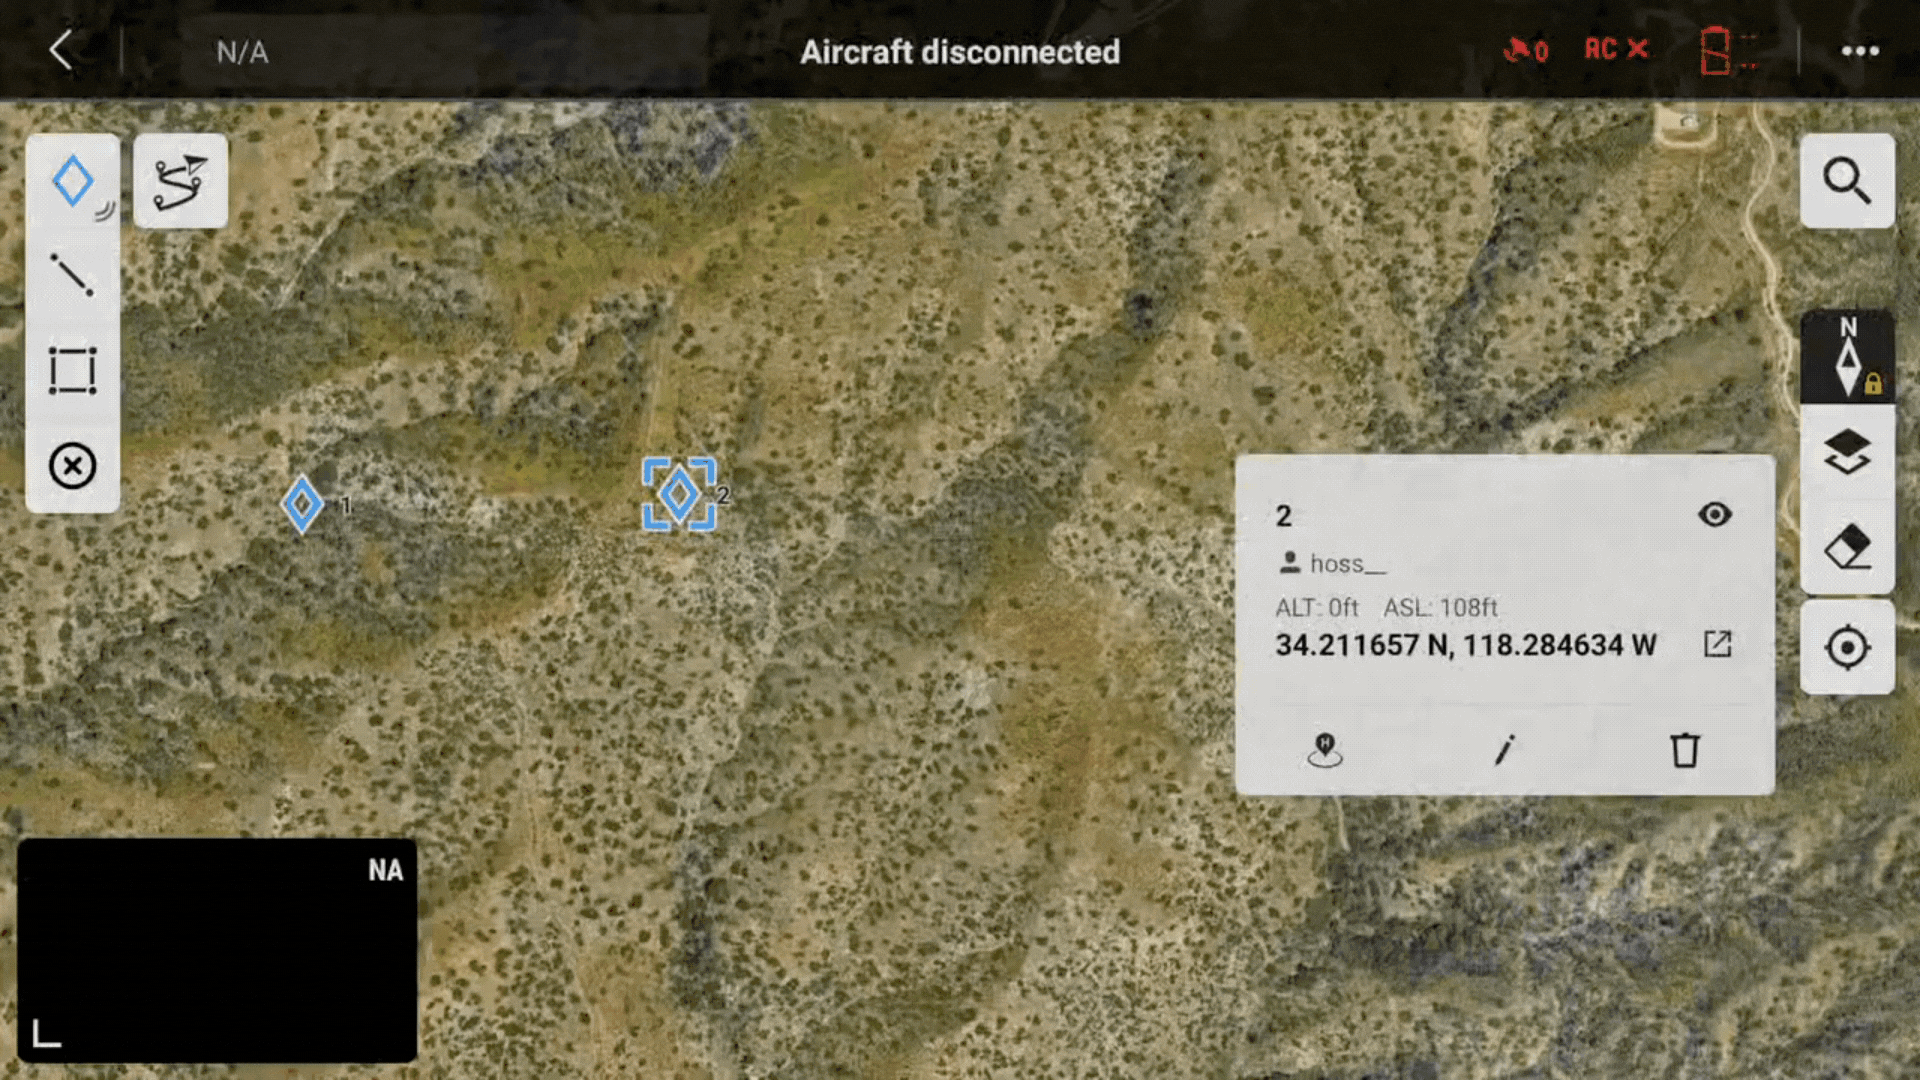
Since the launch of the Matrice 300 RTK and the H20 Series, we have integrated the PinPoint feature into our Enterprise drones. PinPoints allow you to drop a pin of a location being viewed in Pilot 2 and get the coordinates.
The H20 series and M30 series use the built-in laser range finder while the Mavic 3 Enterprise uses the aircraft location. This feature comes in very handy when detecting objects of interest like potential missing persons or in combination with the thermal camera’s temperature area measurement tool to help highlight hot spots. However, having this valuable information on your remote controller can be a waste of valuable information for ground teams, therefore, it is important to understand how to share these “pin” locations with a ground team so they can take action on the data you collect:
Pilot 2 Offline export function of all pins:
- Tap and hold the pin button
- Check all pins
- Export to SD Card
- Import to program ground team is using
Pilot 2: Share specific pin location through a QR code:
- Select a pin on the map
- Select the export icon and scan the QR code with a phone
- Text/Share to team
FlightHub 2: Cloud-based options for pin export and organization
- Organize and export pin(s) to a folder and export to a KML through the FlightHub 2 annotations tab
OR
- The Flighthub 2 map can be viewed in the field on a device browser
See the FlightHub 2 “Annotation Management” section for more details.
Panorama
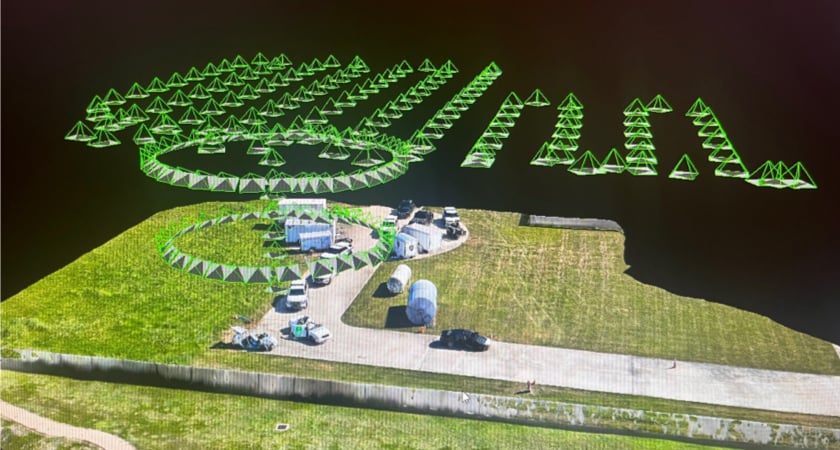
Updated high-resolution imagery of an area can be quickly generated through mapping with a drone by capturing overlapping imagery through an automated mission. This data capture can be planned in Pilot 2 and processed in FlightHub 2 (cloud-based solution) or DJI Terra (offline solution requiring a Windows computer with sufficient computing power). Although in a situation where time is critical, having a quick perspective of the current situation can be key for planning response efforts. That is where Panoramas bring many advantages to response teams including rapid capture of 360-degree information, small size (~30MB), geolocation to the capture location on the map, and the ability to be easily uploaded to map services like DJI FlightHub 2.
How to use Panorama Capture in Pilot 2:
- Photo Mode > Photo > Panorama > Tap on the Capture button
- Supported by Mavic 3 Enterprise Series, Matrice 30 Series, M300/M350 + H20 Series
- To view on an external device the panorama will need to be imported to a viewer such as FlightHub 2 that supports display of the output image.
Note that panoramas cannot be directly overlaid as a 2D map or used for measurements.
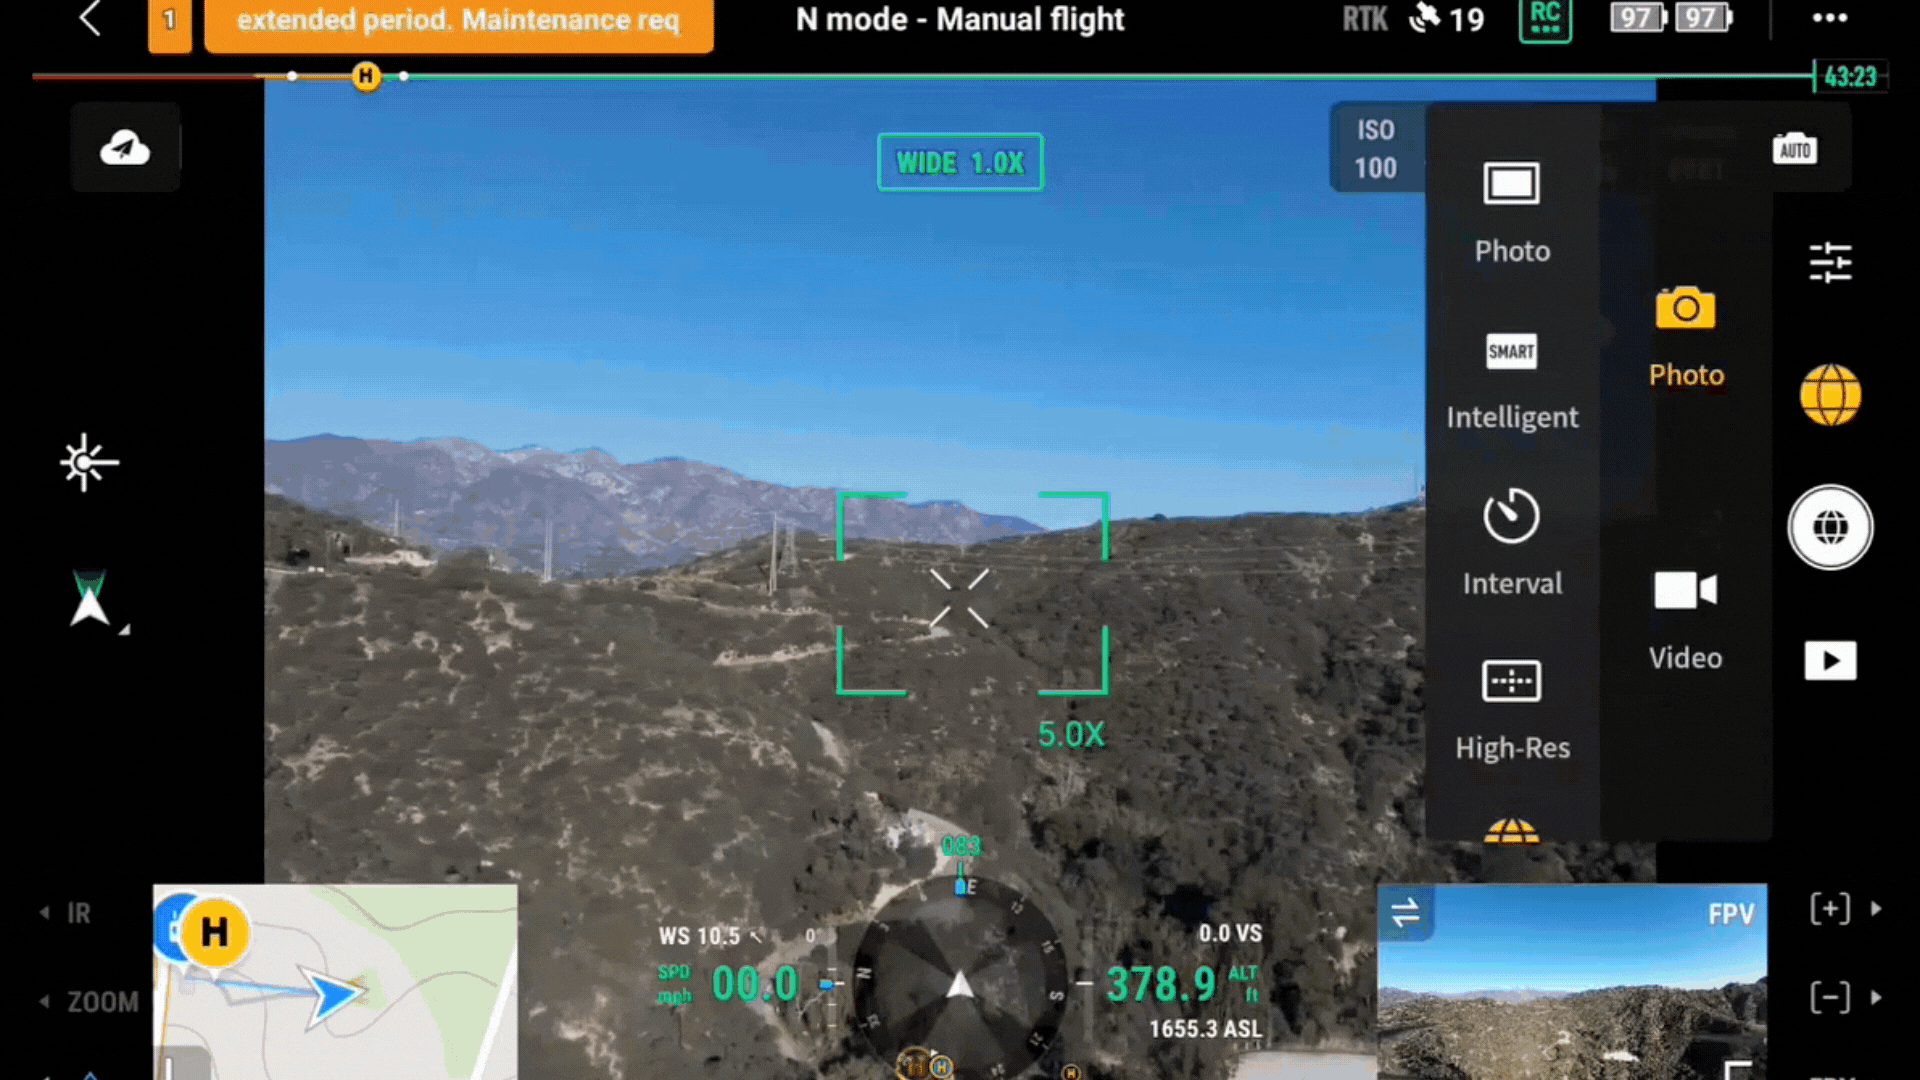
Orbit Flight for Scene Reconstruction
Whether documenting an accident scene on a roadway or another incident, building a detailed and accurate 3D model has become an important tool for responding personnel. Though mapping data is captured from above in a “lawn-mower” pattern, adding detailed oblique imagery from orbits at a lower altitude can be useful to get better details of objects or vertical structures. Before firmware update V7.1, these orbits had to be manually flown, making it difficult for less experienced pilots to capture this data but now it can be easily automated with the Mavic 3 Enterprise Series.
How to Enable Orbit:
- Drop a pin over the center of the scene at orbit altitude
- Fly the drone out to the desired orbit size
- Enable Orbit
- Use right left to start orbiting
Optional: Slowly fly one orbit to check the route. - Lock speed with C1
* Note manual flight, smaller orbit, or different altitudes may be required based on obstructions around the scene.
Automate Photo Capture:
- Lock gimbal pitch with C2 button (avoid horizon in camera view)
- Enable timed photo capture
- Complete a full orbit
- Stop photo capture
Optional: Repeat at a lower/higher altitude for additional data
Customized Flight Areas
Many agencies have started to deploy or explore drones as first responder (DFR) operations. The DJI Dock enables the ability to automate response and the latest update provides the ability to enhance safety with custom flight areas for the Matrice 30 Series and/or DJI Dock. Not only can you define where the drone should and should not fly, but the drone will return to home avoiding flying through the defined no-fly zones automatically.
FlightHub 2: Create a Custom Flight Area
- Connect aircraft and/or DJI Dock to FlightHub 2
- Navigate to geocaging sub-menu
- Draw custom flight areas
- Sync with aircraft
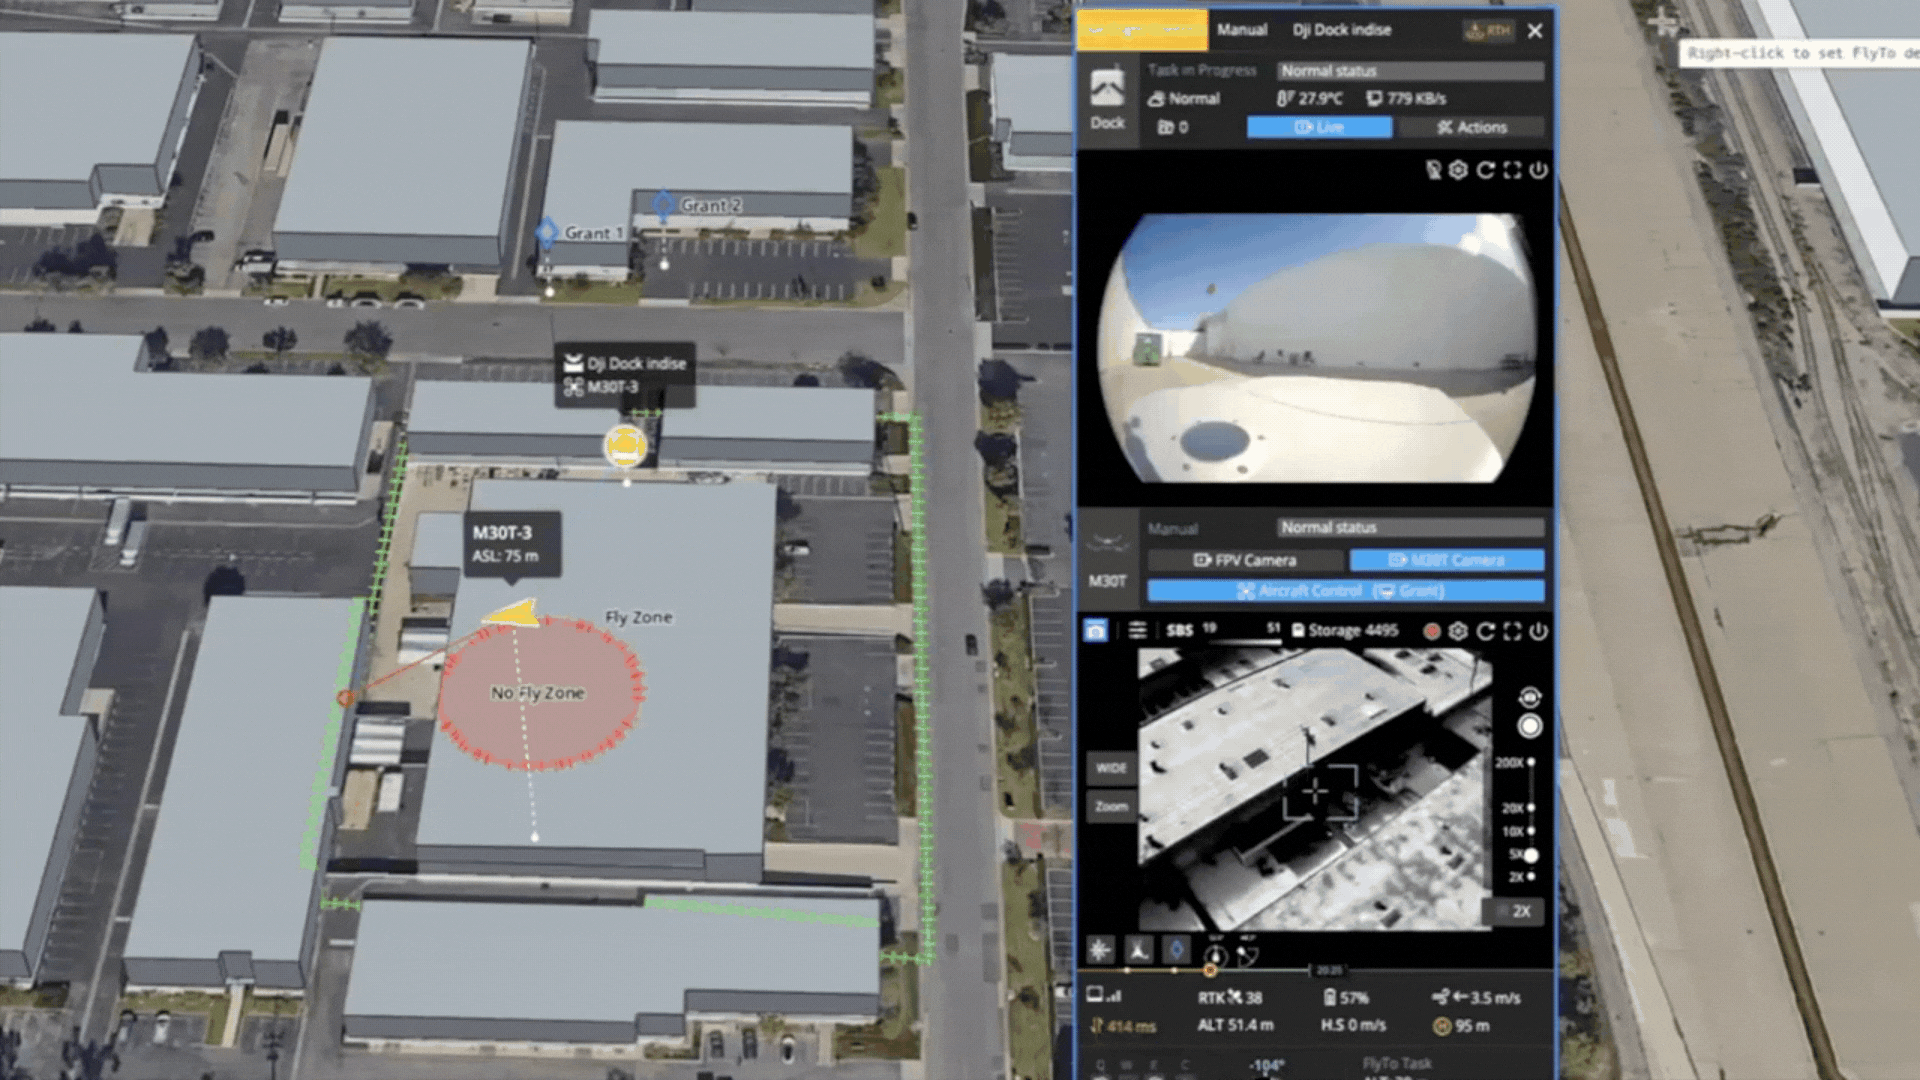
Please see the FlightHub 2 Custom Flight Area section for more details.
Local Data Mode for Secure Missions
When first opening or while utilizing the Pilot 2 mobile application on the remote controller, operators can enable local data mode which disables any internet connection between the Pilot 2 app and the internet.
In addition to the ability to operate completely offline, operators also have the ability to bring in important items for offline operations through an SD card including firmware updates, FlySafe unlocking certificates, and maps. These tools allow an operator to make sure they still have the capabilities they need while operating offline.
Local Data Mode
- Select the Security icon on the home page of the Pilot 2 App
- Go to the Network Security Mode section
- Enable Local Data mode
Offline Firmware Updates
- Download firmware from the DJI official website product page downloads section to an external storage device such as a microSD card
- Run Pilot 2, tap the Health Management System section of the DJI Pilot 2 app, then Firmware Update
- Tap Offline Update to select the firmware package of the remote controller, aircraft, or battery station from the external storage device
- Tap “Update All” to update
Offline FlySafe Unlocking Certificates in DJI Pilot 2
- Download FlySafe unlock from DJI FlySafe portal
- Place unlock file onto SD Card
- Navigate to the GeoZone Unlocking section of the DJI Pilot 2 app
- Import unlock file from SD Card
Offline Map Import in DJI Pilot 2
- Convert map file to mbtiles format and put onto SD Card, insert SD card into the remote controller
- On the DJI Pilot 2 home page select the person icon in the top left, map settings, custom layer, and import.
- The map layer allows one to view and zoom into the location
Note can also download the street view map directly in the Pilot 2 app.
Look At Pin
A drone can be quickly deployed during a foot pursuit to give ground teams insight. If a suspect ditches evidence or you need to return to a location after looking somewhere else, the drone operator can drop a pin and then easily have the camera automatically move back to the location of the pin with the press of a button.
In the upper left corner, you will find the Look At feature. When tapping the last ”Pin” dropped will be selected, and can cycle through with remote controller button shortcuts or by selecting on a map.

Annotations and Flight Paths
FlightHub 2 provides options for two-way communications between a ground team and control center through live streaming, telemetry view, and the ability to sync annotations including lines, points, and polygons. Check out an in-depth video on these features here. This makes it easy for the control center to establish locations and areas for the drone team to search. The team may want to see where the drone has flown after an extended period of operations.
How to View Flight Paths in FlightHub 2
- Import DJI Pilot 2 flight records into a 3rd party service such as AirData
- Group flights into one file and export
- Import to map service of choice such as Flight Hub 2
Smart Track
Drones can be utilized as a second point of view for ground teams providing key insight for the handlers or operators. It has become more popular to see collaboration between drones and ground teams like K9 squads. Custom smart tracking allows the operator to reduce cognitive load by adjusting the gimbal to automatically track the ground team utilizing the zoom camera with the M30 Series and H20 Series.
How to use Smart Tracking on DJI Enterprise Drones
- Enable Smart Track
- Tap and drag on the screen to enable smart track on a custom box
- Select “Track”
- Left and right input will orbit the object being tracked while smart tracking is enabled
- Disable Smart Track to stop
Night Scene
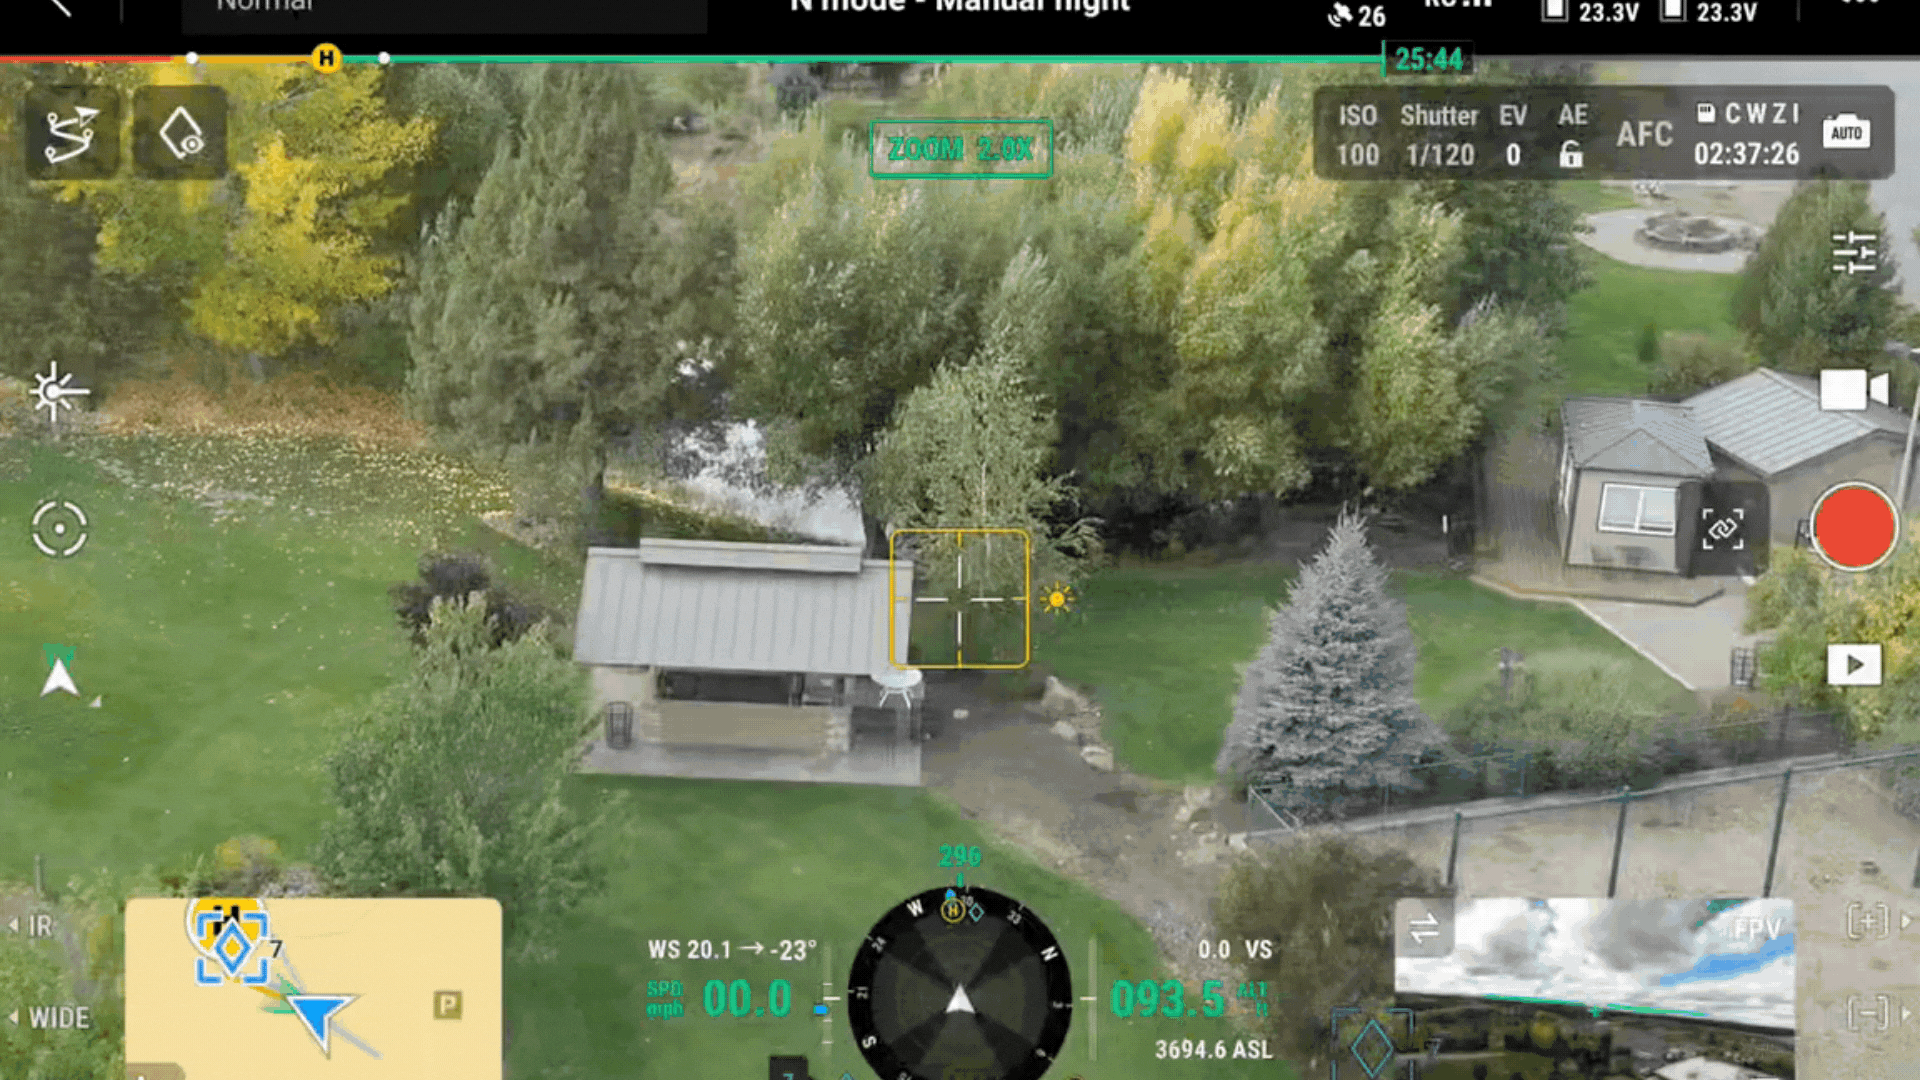
IR Beacons can be utilized to identify team members in low-light conditions. IR Beacons will only show up when the visual (RGB) Zoom camera is in “Night Scene” mode (IR Cut).
Enable Night Scene
- Night Scene is on “Auto” by default but can be turned “On” or “Off” in the Zoom camera settings in Pilot 2
- Zoom camera for M30T starts at 5x
- The Zoom camera for the H20 series starts at 2x
![]()
Note: IR Beacons don’t show up on thermal camera
Enhance Live Streaming
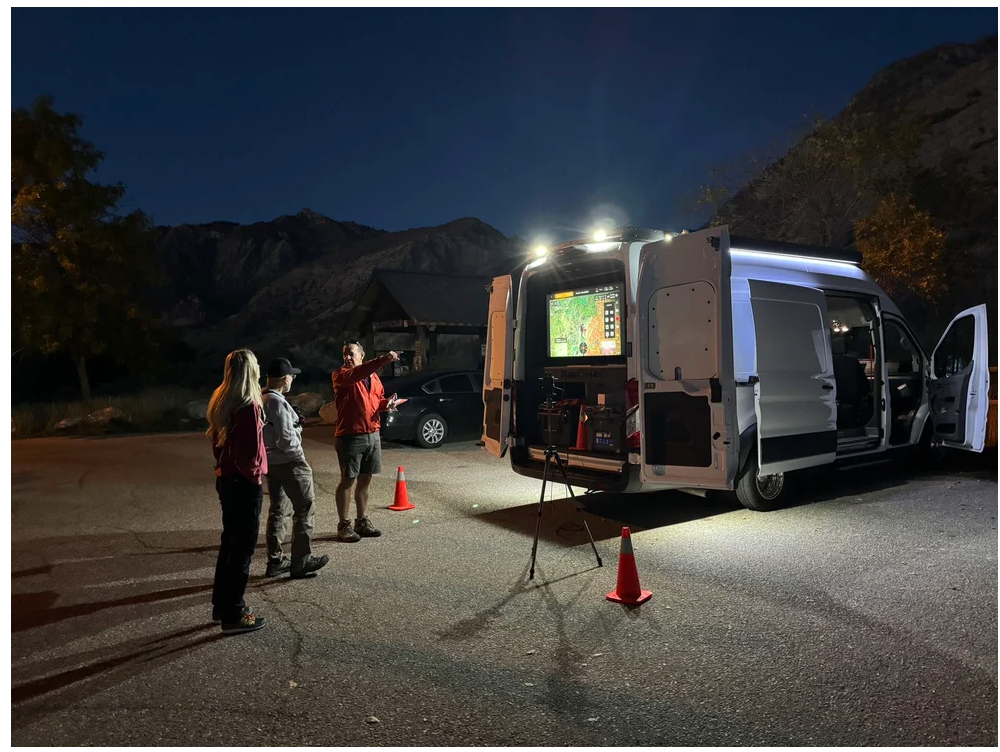
Use of DJI Transmission to connect drone video feed to Command Van. Photo via Weber County SAR.
It doesn’t matter if it's law enforcement, firefighting, or search and rescue, integrating public safety drones is all about teamwork. Collaboration between pilots and ground teams requires non-drone operators to have access to the drone bird-eye view, in order to communicate the findings and make accurate decisions.
Live streaming is a common tool used by operators to respond to incidents. This can take place through FlightHub 2 where a link to the video feed can easily be shared with stakeholders or through DJI’s open ecosystem which developers have used to provide custom software and hardware that fits the needs of operators. To improve network reliability and speed for an operator in a fixed location, the remote controller can be connected directly to ethernet if needed.
Connect RC Plus to Ethernet:
- Connect ethernet through adapter to USB-A port on top of RC Plus
OR
- Unscrew and open the back port on the RC Plus.
- Find the USB-C port. Please note this is a male USB-C port in the back.
- Connect a USB-C female to a USB-C female adapter.
- Connect a USB-C to the RJ 45 adapter.
- Connect Ethernet to RJ45 adapter.
Ethernet connection can provide smoother live streaming vs. Wi-Fi in scenarios where pilots usually fly from designated take-off locations such as Drone as First Responder operations from the command center, or when you have an operational vehicle with a satellite internet service.
Broadcasting a Video Feed Locally While Offline
In some cases, there may not be internet available for live streaming. Having non-pilot team members looking directly at the remote controllers makes things slower and riskier, as the pilot (or pilots) might get distracted by the surrounding members. Connecting an HDMI cord from the TV to a remote controller is one option but may inhibit the ability of the pilot to be in the best location for flight.
With the DJI Transmission combo, streaming to a command vehicle doesn’t need internet or another streaming device on site. The DJI transmission combo uses O3 Pro video transmission technology to provide on-ground transmission.
With the DJI Transmission High-Bright Monitor combo, you can just hand off the receiver monitor to the commander or team leader for the operation. It allows the personnel at the scene to view the feed without standing over the shoulder of the drone operator trying to watch the screen. Or the stand-alone receiver can be used to connect to a TV without tethering the pilot.
The broadcast mode function allows multiple receiver monitors which can support different teams having the same drone view with low latency. It can help the commander better mobilize their teams to complete difficult tasks.
DJI Drones offer an option to share the Remote Controller’s Video Feed to on-site teams through an HDMI connection, which then can be plugged into a monitor or other displays like DJI Transmission.
Set up HDMI Video Feed in DJI Pilot 2
- When in the camera view select the 3 dots in the top right
- Select HD Sub Menu (Image Transmission Settings)
- Scroll down and adjust the Video Output Type
Set up DJI transmission system with DJI Enterprise Remote Controllers
- Connect the remote controller or other device with HDMI out to the transmitter
- Utilize 2 receivers at max bandwidth
- Wireless receiver options with a screen or simply for video out
- Does not utilize the internet
The pilot doesn’t need to stand by the TV screen and deal with the distance limitation of the HDMI Cable connected to the remote controller. The pilot can easily connect the remote controller to the DJI Video Transmitter and move freely.
As the use of drones continues to expand, we are committed to continue enhancing the pilot experience and providing more valuable features for those working on the frontlines.

-2.png?width=300&name=HS%20-%20Featured%20Images%20(2)-2.png)

