
When road accidents occur, public safety personnel will often need to document the scene. This critical step, also known as accident reconstruction, is a delicate balancing act between accuracy and speed - every second the road remains obstructed means heavier traffic and increased safety risk for everyone involved.
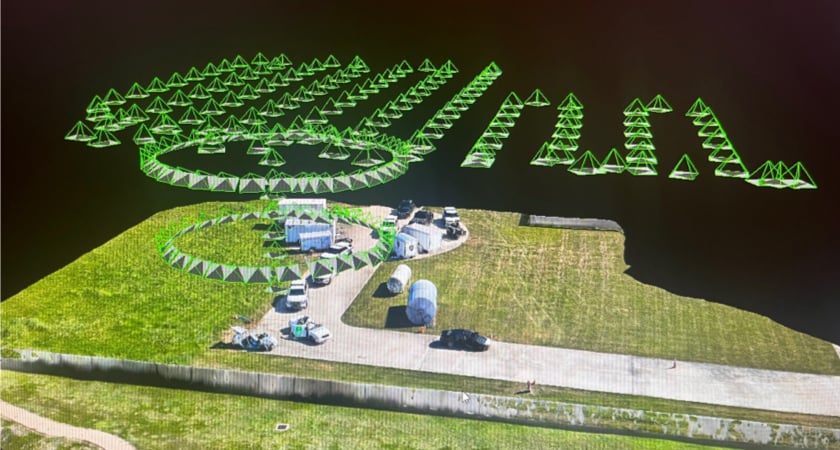
Drones are a proven answer to help document scenes and keep personnel safe. sUAS mapping takes a fraction of the time of traditional or legacy scene documentation (e.g. total stations), resulting in quick clearance. Actual scenes are preserved in 3D with detailed information and centimeter accuracy.
Here is a quick summary of the workflow and links to resources that this article goes into much greater depth on. Overall different teams utilize different methods and we encourage networking with other agencies to find what works best for you.
Collect Data
1. Enable proper camera settings and RTK (see guide).2. Plan an automated mapping or oblique mission in DJI Pilot 2 at ~75-125 feet.
3. If needed, fly a circle around the scene at ~25 and ~50 feet with timed photo setting turned on.
4. If flying at night, consider motion blur and camera settings.
Process Data
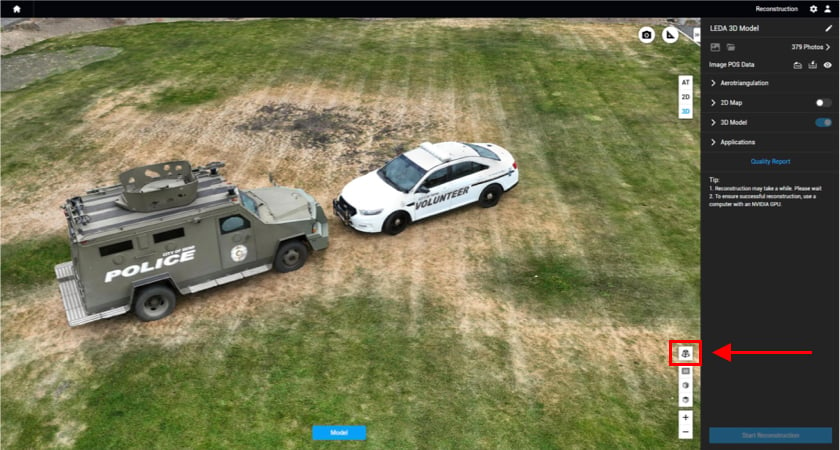
5. Process data in DJI Terra.Utilize Data
6. Utilize 2D Map and 3D Model/Point Cloud output.Collect data
Scene considerations
Before capturing data it is important to consider if the accuracy of the model is an important factor or if it will be used simply for situational awareness. Utilizing ground control points and connecting the drone to RTK are avenues to increase accuracy, while Checkpoints provide an avenue to verify accuracy. Recording GCPs/Checkpoints can be completed with a survey-grade GNSS RTK rover.
Without checkpoints it is possible to estimate the relative accuracy through utilizing measurements from the scene or looking at the georeferenced RMSE in the DJI Terra Quality report.
During data capture, be considerate of prop wash and any evidence that may be disturbed.
Data capture settings
With a 0.7s photo interval, 15m/s max speed, mechanical shutter, and 4/3 inch CMOS Wide Camera the Mavic 3 Enterprise is a great hardware choice for accident reconstruction. This system can also utilize an attachable RTK module for corrections allowing for a few checkpoints to be used instead of many ground control points. DJI Pilot 2 is the free ground control software that is automatically installed on the remote controller and is updated with the remote controller.
It is recommended to use the below data capture settings which are covered in our Mavic 3 Enterprise Survey Guide:
- Image Format: JPG
- Image Ratio: 4:3
- Mechanical Shutter: ON
- Dewarping: OFF
- RTK: Enabled (Recommended)
Automated data capture
As a first step, automated data collection is important to collect overlapping photos of the entire scene. During the daytime this is accomplished through the Flight Route section of the Pilot 2 app by selecting Mapping, Mapping with Smart Oblique selected, or Oblique.
When mission planning, we strongly recommend incorporating the below into your parameters/settings.
Mission Planning Settings:
- Default overlap of at least 70% side and 80% front. Consider higher overlap if the subject does not have much variance to help the photogrammetry software stitch the photos together.
- When running a mapping mission with the M3E or P1 select the smart oblique option if the area allows.
- For a smaller accident scene generally speaking it is advantageous to fly at the lowest safe altitude to clear all obstacles, often at an altitude between 75-125 feet. As the scene expands in size one must evaluate flight time and resolution which have an inverse relationship due to the required overlap of the photos.
Manual data capture
After the high-level data capture has been completed it is important to consider collecting additional photos of the scene at a lower altitude if a lower ground sampling distance is needed.
For example, if there was a tree canopy on both sides of the road and the original automated mission flight was flown at 125 feet AGL, then a manual flight at a lower altitude could gather supplemental images.
Completing manual data capture is most easily accomplished by:
- Taking photos while descending from the higher level data capture altitude
- Adjust the drone position and camera pitch angle to put the vehicle or area of interest in the center of the frame. Monitor the pitch angle to keep the sky and surrounding landscape out of the photo.
- Turn on the timed photo setting (i.e. every 2 seconds) to collect overlapping photos while flying
- Fly a circle around the scene at ~50-75 feet
- Descend another 25 feet to ~25-50 feet
- Fly another circle around the scene at ~25-50 feet
- Stop the timed photos and land the drone
Night time considerations
Because the drone is moving at a fast speed during data collection the processes above work best during the day. When shifting into nighttime there are different considerations. The Mavic 3 Enterprise utilizes a larger sensor size and mechanical shutter which aids in capturing data at night.
Comparison photo between M2EA (left) and M3E (right) flying a mapping mission at 40 feet AGL at 2.3 mph
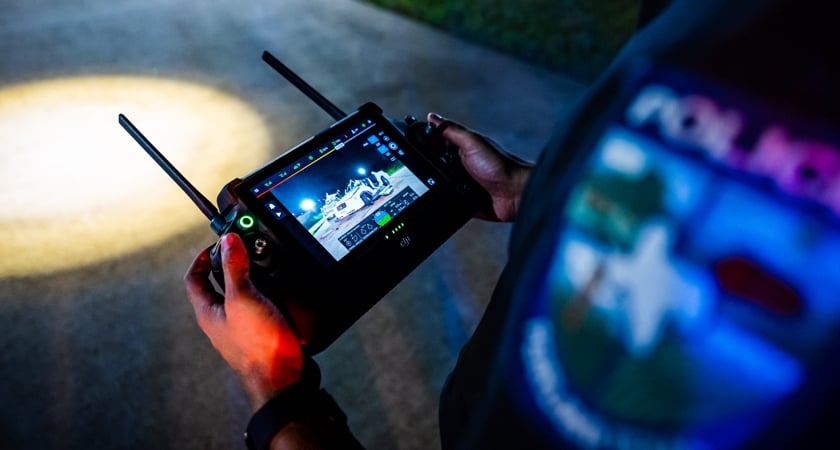
First off, the pilot needs to be very careful in regard to flight safety as the vision systems utilized for obstacle detection will be deactivated in low-light conditions. Consider having a visual observer closely watch the aircraft status during the flight.
Next is properly lighting the scene. Setting up lights at an elevated (~8 ft.) position around the scene and angling them down will create a halo of light around the subject. At this point, the operator can put a drone over the accident scene to tell if the lights are creating an overexposed photo. If so, adjust light power or back the light(s) up.
If you can’t see details in the images they will not come across in the maps or models. Overall it is easier to work with some shadows than to have overexposed images.
Given that a scene may be larger than a single area you can light up with available lights, one technique would be to place ground control point(s) on the edges of the lighted area that can then be included within multiple data captures.


Automated missions at night:
When planning an automated mission at night you will want to significantly reduce flight speed to the lowest possible value to avoid blur and plan the mission flight only in the “halo” of light created by the lights. Flying as low as 40 feet if there are no obstacles can also be advantageous. Overall this would be the most straightforward approach for data collection but will need to make sure to check photos after data collection and closely monitor the drone during flight.
Manual data capture at night:
To ensure good image quality, you may need to adjust the camera parameters manually instead of simply allowing the Auto setting to do the work. For example, you can adjust shutter speed up if parts of the scene appear blown out and you are not able to move the lights.
A longer exposure value will allow more light to shine in. However, depending on the payload and light being used, the pilot may need to pause while the photo is taken to avoid blurriness. Generally speaking, keeping the shutter speed at 1/60 will help avoid any blur even while the drone is moving. During manual data capture, the on-screen grid overlay in the Pilot 2 app can be used as a reference for overlap.
Another option used by some agencies is to take a video while flying the drone and pull out the frames as images.
Process data
Processing of imagery in DJI Terra can provide an accurate 2D map and 3D model to document the scene. Overall the process is fairly simple as covered in our getting started guide and video.
- Import photos and choose settings/output files
- When using the RTK module accessory (detailed in our survey guide) with the Mavic 3 Enterprise the metadata will automatically take the corrections into account. If using a NTRIP service it is important to define the correct coordinate system for the images before processing (i.e. NAD83 EPSG 4269).
- If too wide of an area was captured, after importing photos you can select a certain group of photos to process based on the x/y GPS location or following Aerotriangulation can select a certain area of the scene to process.
- Complete aerotriangulation
- Add GCP’s/Checkpoints
- Process 2D map and 3D model.
- A high-powered Windows computer is required for processing models within DJI Terra.
- After processing, you can check the report to see accuracy of checkpoints and measure your scale constraint.
We encourage you to try out Terra with a 1-month trial available at the bottom of the DJI Terra webpage.
Utilize output
After data processing has been finished there are different options to utilize the output. Overall this process allows investigators, prosecutors, and jury members to revisit the scene at any time and from any location.
For simple data sharing screenshots of the 2D map or 3D model can be included within a pdf. Or turning on the automatic 360 rotation tool in DJI Terra highlighted in the photo below is a useful tool to integrate within a screen recording.
The files themselves can also be shared including the images, GCP’s, 2D map and 3D model which can be viewed on another Windows computer that has installed DJI Terra (free of charge for viewing) or other GIS software.
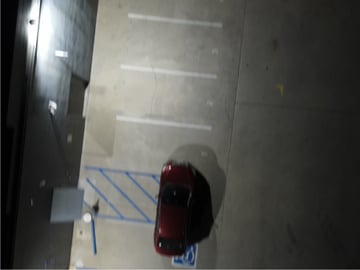
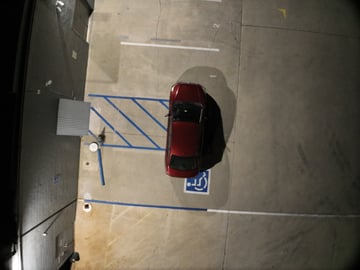
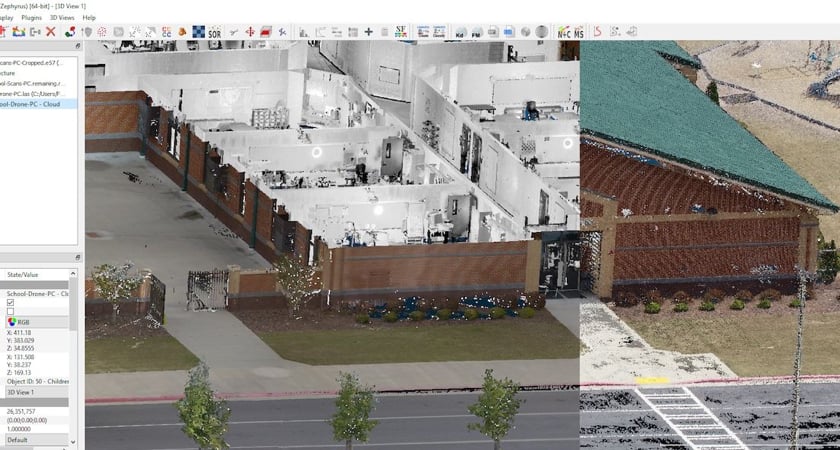
Additionally, importing the data into specialized software allows for the ability to determine bullet trajectory, define line of sight, or perform crush, momentum, and other types of forensic analyses. The point cloud can even be merged with ground scanner data utilizing free software such as CloudCompare. The image below shows an example with and without drone data.
Thank you
Thank you to Aaron Beckman, Eric Gunderson, and Brandon Karr, for their contributions to the use of UAS in public safety and this article.


-2.png?width=300&name=HS%20-%20Featured%20Images%20(2)-2.png)

