
With the rise of large commercial buildings across the US, the demand for safe and effective inspection of rooftops has been growing substantially.
Every roof is unique, and every roof has multiple inspection needs. Leaks and holes can cost thousands and cause other issues within the building, and large commercial buildings can have HVAC systems and solar panels installed that all need a routine inspection.
The rise of drones over the past decade has changed the way we inspect rooftops. There’s no longer a need to get ladders out and have boots leave the ground. A simple drone flight can gather valuable information that can easily be shared back to stakeholders and decision-makers.
In this article, we will take a close look at the steps you need to take when utilizing drones to inspect a roof.
Table of Contents
Collect Data
- Understanding the Asset
- Establishing the Mission Goal
- Checking Sensor Settings
- Planning a Flight
- Capturing Data
- Manual Inspection
Process Data
- Thermal & Visual Datasets
- Ground Control Points/Checkpoints
- DJI Terra Settings
Display Data
- Third-Party Analysis Providers
Collect Data
Understanding the Asset
Rooftops come in all different shapes and sizes. Some inspections are for residential roofs, and many are commercial. It’s important to take a look at the scope of the project to understand how best to tackle the site.
The size of the roof is one factor to consider. If it’s a small roof, extra detail can be captured in a matter of minutes (or even seconds). Large commercial roofs may require extended flight times, so plan accordingly.
The height of the building is a major factor when planning a mission. A quick flight to the top of the building can give you a read on the building’s height, so you can better plan the mission.
Another major factor is understanding the building's surroundings. The Mavic 3 Enterprise utilizes O3 Enterprise Transmission to provide stable connection to the drone, along with Omnidirectional Obstacle Avoidance and APAS 5.0 to help keep the drone safe when flying in tight environments and come home safely when the mission is complete. We always want to fly in a safe manner, so if the roof inspection is of a building with a parking lot next to it, make sure you follow the FAA’s guidelines on operation above people. When planning a mission, make sure the green flight line doesn’t fall too far outside of the perimeter of the building if this is a factor.
Establishing the Mission Goal
There can be many different assets on a rooftop, so it’s important to understand the goal of the project. Different goals may demand a different data source (visual, thermal, etc) or different accuracy/resolution requirements.
Some of the main use cases for roof inspections are:
- Cracks/leak detection
- HVAC inspections
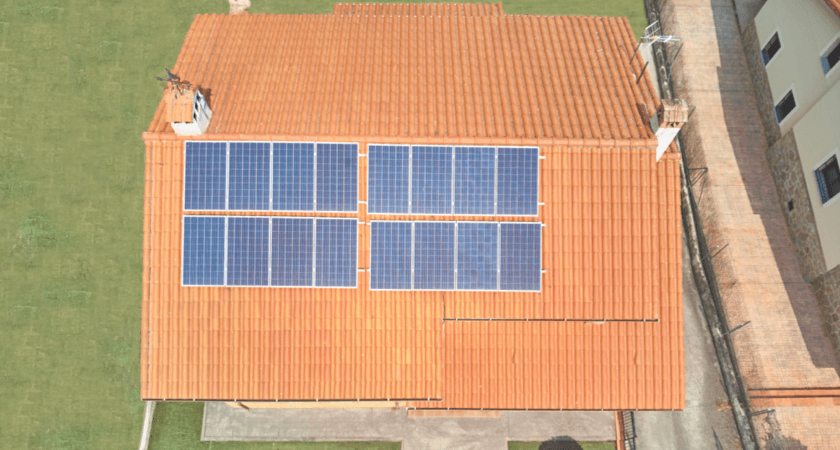
- Solar panel inspections
- Exhaust inspections
- Measurement needs
When looking at use cases that require a thermal sensor (solar panel inspection, leak detection, HVAC inspections, etc), the flight oftentimes should be conducted right after sunset. This ensures no Thermal Loading from direct sunlight, but the roof/solar panels will still be warm from the day. Obviously finding cracks in a roof would be nearly impossible with the visual sensor at dusk, so sometimes flying the same roof twice (before and after sunset) is required.
For leak detection, try NOT to fly directly after it rains. It’s best to wait at least 24 hours after it’s rained (up to a week after), to understand drainage/leakage. Thermal analysis will also be a challenge if flown too close to a rain event if there’s standing water hiding an issue.
It’s also important to gauge the size of the building. Don’t try to fly 20 feet from the top of the roof on a super large commercial building the first time out. Not only would this take too long, it could also be a dangerous flight for an inexperienced pilot. With the Mavic 3 Enterprise’s 42 minutes of flight time with the RTK module attached, large missions are possible - just plan accordingly.
Data accuracy requirements for your roof inspection are another aspect to consider. Often measuring targets with a base station at the top of the roof can be difficult, but with the Mavic 3 Enterprise and RTK module, you can generate centimeter-level accuracy without the need for Ground Control Points (checkpoints are still required to validate the accuracy). Often data accuracy isn’t of primary importance because so much of this use case is inspection oriented, but if the data requires to be aligned with other jobsite data, RTK is a great option. RTK, PPK and Cloud PPK technologies can help you obtain a high-level of accuracy for your project.
Checking Sensor Settings
There are a couple different factors to consider when choosing your camera/sensor settings. Auto setting will usually be sufficient to gather good data, but if you are looking for some guidelines for what the visual sensor should be set to, here are our recommendations:
- Shutter speed of 1/1000 or higher during a day flight. When flying at night motion blur will be a major factor, so try and set the shutter speed as fast as you can while still being able to clearly see the roof.
- Utilize ISO to off-balance the shutter speed. During the day it’s best to keep the ISO in Auto, but during night flights you can use it to help “brighten” the image if you need to use quicker shutter speeds.
- Image Format: JPG
- Image Ratio 4:3
- Mechanical Shutter: ON
- Sensors to Capture (if capturing thermal): ALL
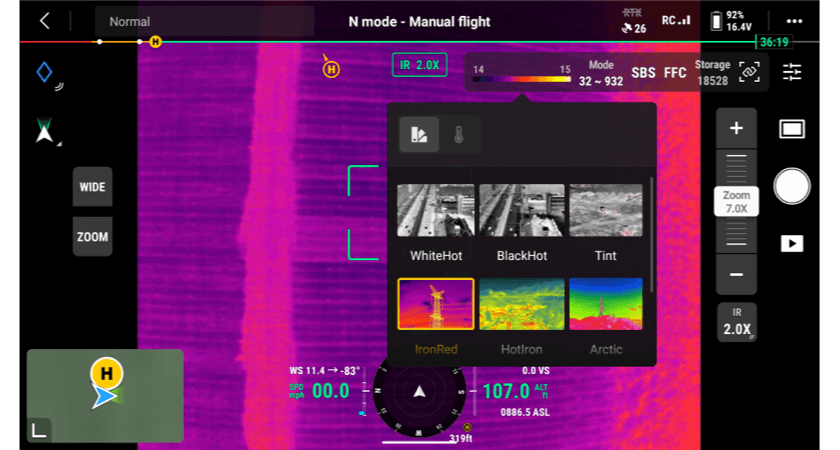
- If it’s a thermal inspection, we typically suggest setting the color palette to IronRed since there’s a large differentiation in colors across the temperatures in the camera's view.
We also recommend taking the time at the beginning to do a quick flight over the roof. This can help you find the best camera settings before flight. A roof can be much brighter than you anticipate, and if you lock in the camera settings Manually over the first waypoint often the imagery will be “blown out”.
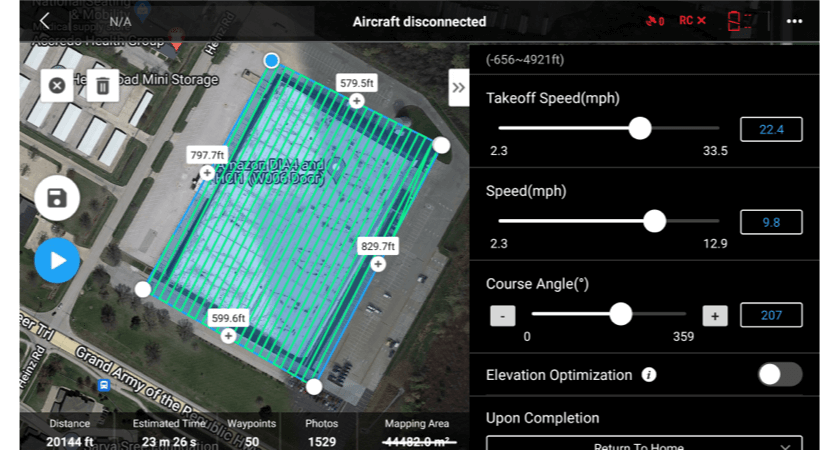
Planning a flight
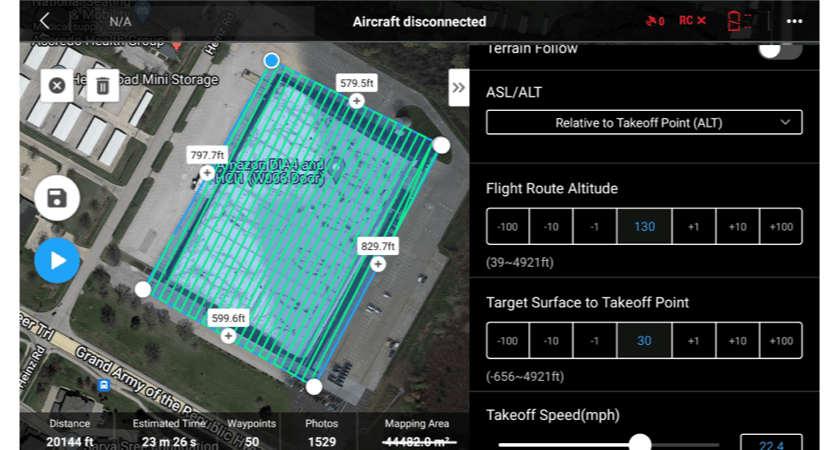
The most common method of inspecting a roof is gathering enough overlapping photos to produce a high-resolution map and 3D model of the roof. This can be accomplished with the DJI Pilot 2 App if you are utilizing the Mavic 3 Enterprise Series drone.
When mission planning, the best method is to choose the Mapping Mission option. Here’s a guide to help you get started on Mapping Missions.
And here are some setting we recommend specifically for roof inspections:
- Use the default overlap settings of 70% frontlap and 80% frontlap. This should be sufficient for high-quality 3D model reconstruction for the visual sensor.
- If thermal is required, we recommend 80% sidelap and frontlap.
- When selecting a height, you will want to utilize both Flight Route Altitude and Target Surface to Takeoff Point sliders. The optimal flight height above a roof for residential buildings is 25-50 feet above the roof. For larger commercial buildings, that resolution may not be achievable, so planning 50-100 feet above the roof should be sufficient. By utilizing a quick flight to check the building height, you can set the mission altitude accordingly. For example, if you height check a residential roof and the roof is 25 feet, set the Target Surface to Takeoff Point as 25 feet, and the mission altitude to 50-75 feet. For commercial, if you height check a 50 foot roof, plan the Target Surface to Takeoff at 50 feet and the Flight Route Altitude to 100-150 feet.
- By using the Target Surface to Takeoff Point slider you can still achieve the correct overlap settings even if the drone was launched from the ground. With the Mavic 3 Enterprise’s 4/3” sensor you can capture incredible detail with a large dynamic range.
- Here are some GSD estimations with M3E:
25 feet 0.2 cm/pixel 50 feet 0.4 cm/pixel 75 feet 0.6 cm/pixel 100 feet 0.8 cm/pixel
- Here are some GSD estimations with M3E:
- Here are some GSD estimations with M3T:
25 feet 0.26 cm/pixel visual, 1 cm/pixel Thermal 50 feet 0.53 cm/pixel visual, 1.98 cm/pixel Thermal 75 feet 0.78 cm/pixel visual, 2.97 cm/pixel Thermal 100 feet 1.05 cm/pixel visual, 3.96 cm/pixel Thermal
- If 3D reconstruction is your goal, the Mavic 3 Enterprise series can utilize the Smart Oblique function. This helps take control of the gimbal during flight to automatically capture oblique imagery instead of just NADIR.
- IMPORTANT: if the goal is a solar inspection on a roof utilizing thermal, Smart Oblique is NOT RECOMMENDED for accurate temperature readings
- Flight direction and speed are other aspects to consider. The Mavic 3 Enterprise utilizes a 4/3” Mechanical Shutter, which allows for quick capture while maintaining image accuracy and minimizing image distortion. Its 0.7 second capture time allows the drone to survey much faster than previous versions. Flight speed isn’t as important for the Mavic 3 Enterprise, but if the goal is a Thermal Inspection with the M3T, try to limit the top speed below 10 mph (~4.4 m/s) to minimize image blur and incorrect image readings from the thermal sensor.
- When planning flight direction and capturing just visual imagery it’s recommended to fly in the most efficient direction. For Thermal solar panel inspections on rooftops, it’s recommended to fly parallel to the panels for the best results when processing the data
Capturing Data
After understanding the building, establishing the scope of the project, and preparing your mapping mission, you should be ready to capture the site.
Always make sure you can maintain visual line of sight with your drone, which can be difficult when capturing building rooftops. Keep a close eye on the drone’s flight plan and camera FPV to make sure you aren’t operating over people. When your mission is complete, the drone will either come home or sit and loiter (depending on your End of Mission settings).
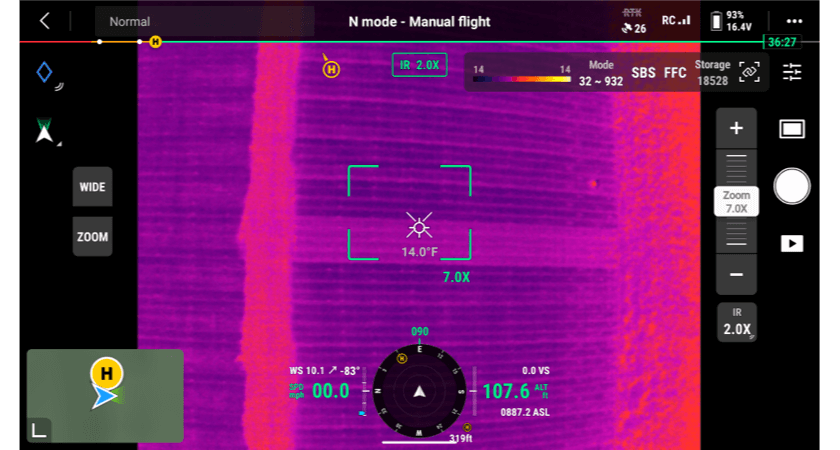
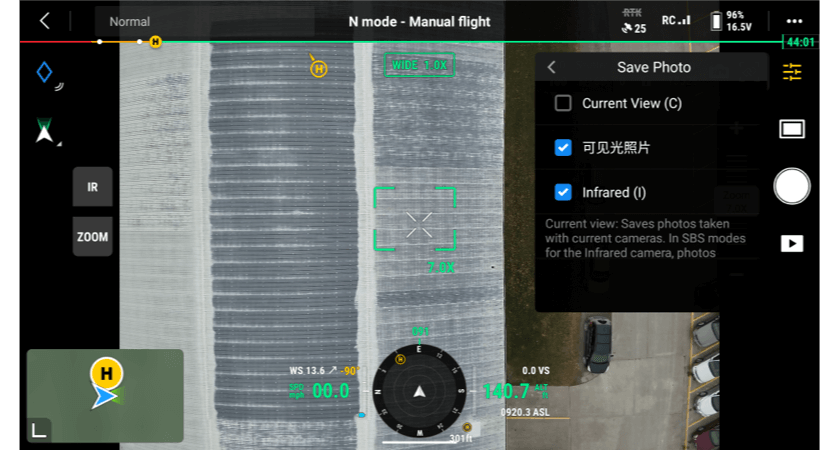
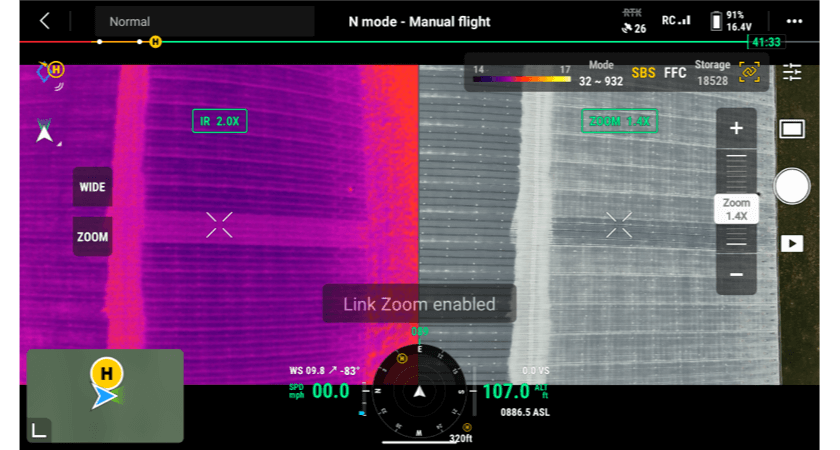
Manual Inspection
After the automated mission is complete, you can (optionally) capture extra data of the site. The manual capture screen shown below has many features to help you get the most from your manual inspection. The Mavic 3 Enterprise and the Mavic 3 Thermal both utilize a 56x hybrid telezoom sensor, and by using the right scroll wheel you can adjust the zoom level of the sensor.
To help better understand your target when manually inspecting with the Mavic 3T, DJI offers Side by Side view to show both the zoom and thermal camera next to each other. By clicking the SBS button on the screen you can choose to have both views up at once.
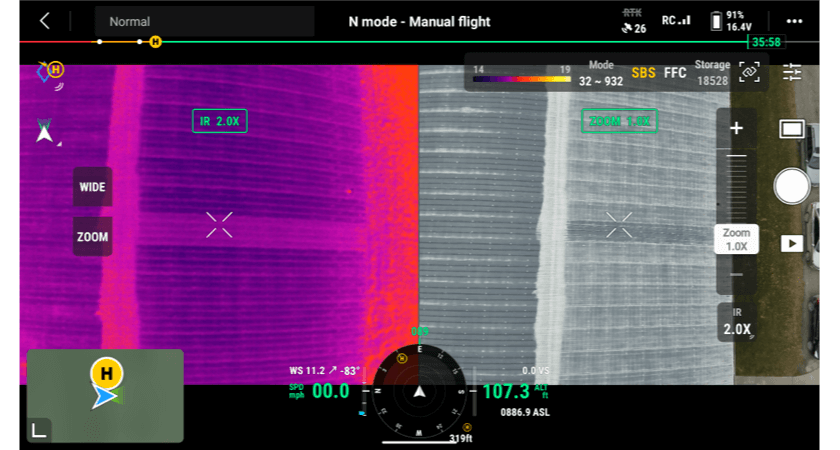
If you are using the zoom sensor with the M3T, we also recommend using the Link Zoom feature to keep the Zoom and the Thermal sensors locked at the same zoom level.
Process Data
Thermal & Visual Datasets
Once the site has been captured, it’s time to turn the data into a high-quality 2D orthomosaic and 3D Model. Utilizing DJI Terra, the process is simple to get great datasets. Take a look at this video to learn more on the steps to process data within DJI Terra.
Quick steps for processing data with DJI Terra are:
- Import the photos/folders into DJI Terra
- If processing both Visual and Thermal datasets, we recommend processing the datasets separately
- Select the output types (2D Map, 3D Model) and file extensions (Tiff, Obj, etc.) you are looking for, and define the coordinate system (if using an NTRIP service)
- Run the Aerotriangulation
- Optionally you can change the boundary of reconstruction at this point, this can help speed up processing times and output data sizes when focusing only on the asset to stitch
- Optional Step: Import Ground Control Point data and select correct EPSG code for region. Use this Ground Control Points guide to learn more.
- Run the 2D map and 3D model reconstruction steps
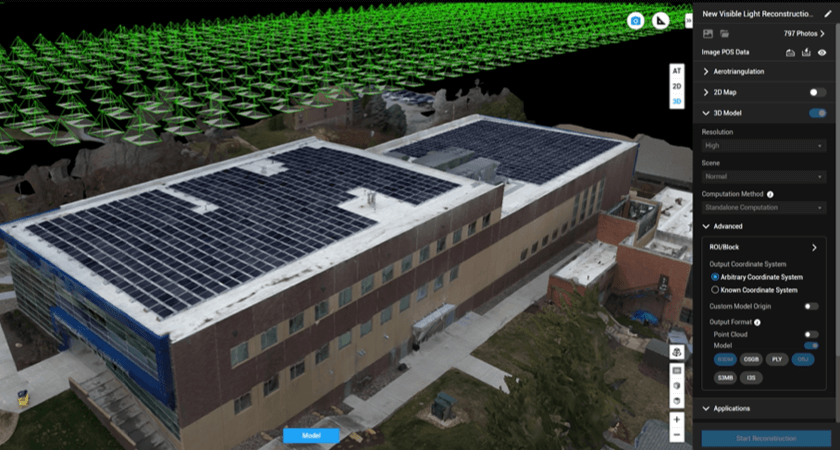
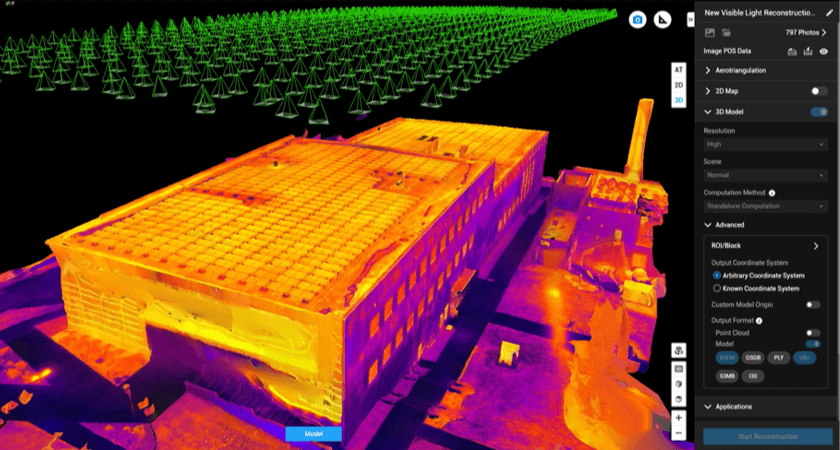
Please note, DJI Terra doesn’t guarantee a radiometric stitched output, just the raw imagery
When completed, you can view the Accuracy Report to understand map accuracy. Your data is now ready to be viewed and exported.
We encourage you to try out Terra with a 1-month trial available at the bottom of the DJI Terra webpage.
Display Data
DJI Terra has a couple functions to help you view and analyze your data. You can measure cracks and leaks with our Annotation Tools, and by using the mouse can you navigate around the 3D model. If displaying for an extended period of time, DJI Terra has a tool to orbit the 3D model indefinitely.
Let’s look at the typical outputs for roof inspections.
It’s common to analyze a 2D orthomosaic instead of a 3D model when looking for leaks, cracks, and thermal irregularities. A 3D model helps give perspective to the site, but often 3rd party analysis tools for thermal inspections analyze the raw imagery instead of the 3D model. If a client is asking for a dataset, here are some supported outputs by DJI Terra. All of the data exported is georeferenced and can be imported into a 3rd party analysis tool of choice (DroneDeploy, Raptor Maps, etc.)
DJI also has a Thermal Analysis Tool. Within this application, you can analyze raw images and processed datasets to fully understand the temperature readings. There's also a publically available tool from Eric Olsen to convert your thermal data to RJPG to allow you to import into Flir's Thermal Analysis tools.
Third-Party Analysis Providers
There are many specialized solutions out there to help automate inspection analysis. If you want to automate crack detection, leak detection, solar inspections, or more, check out these solution providers that can help automate the workflow.
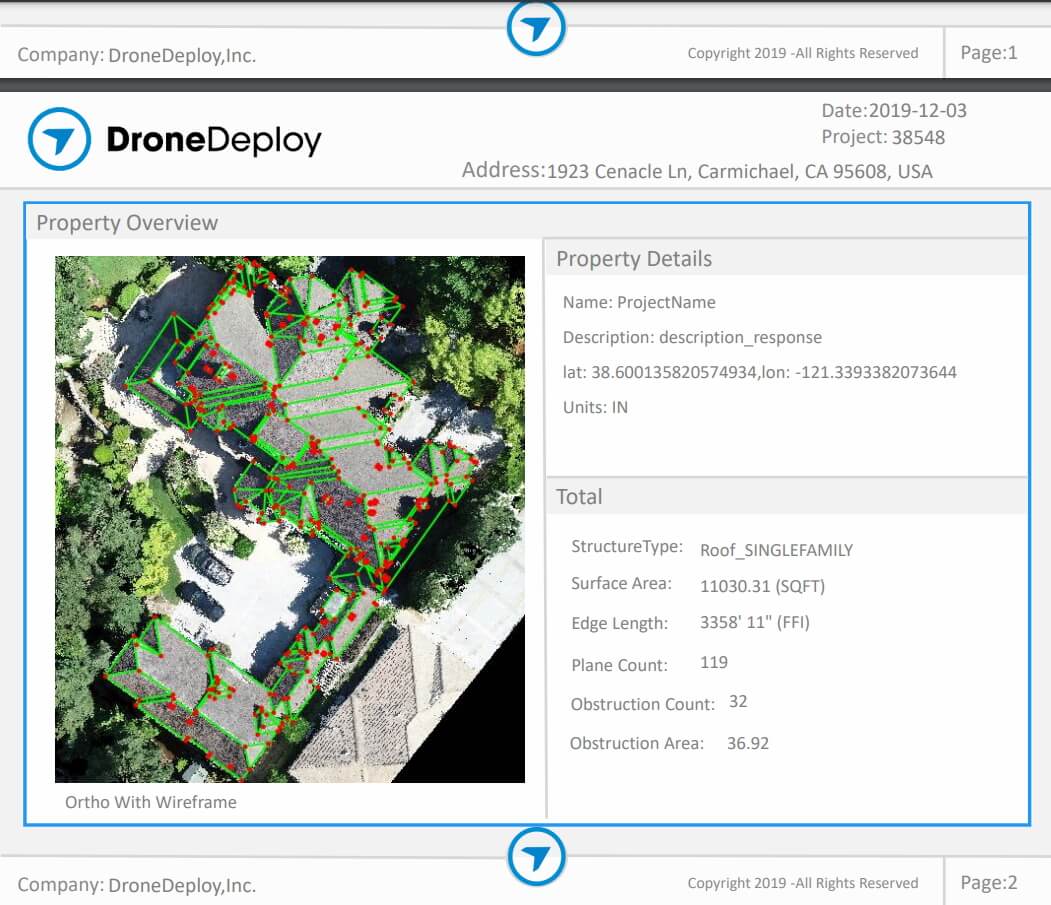
DroneDeploy is a cloud processing provider that has mapped and processed over 500 million acres worldwide. Their tools span across many different industries (Construction, Agriculture, Oil & Gas, Solar, etc). DroneDeploy have a few specialized tools and reports specifically on roof inspections.
DroneDeploy’s Roof Report helps get dimensions of roofs from a processed 3D model. The use case is more for solar roof installation planning and understanding roof size but doesn’t have automated damage detection.
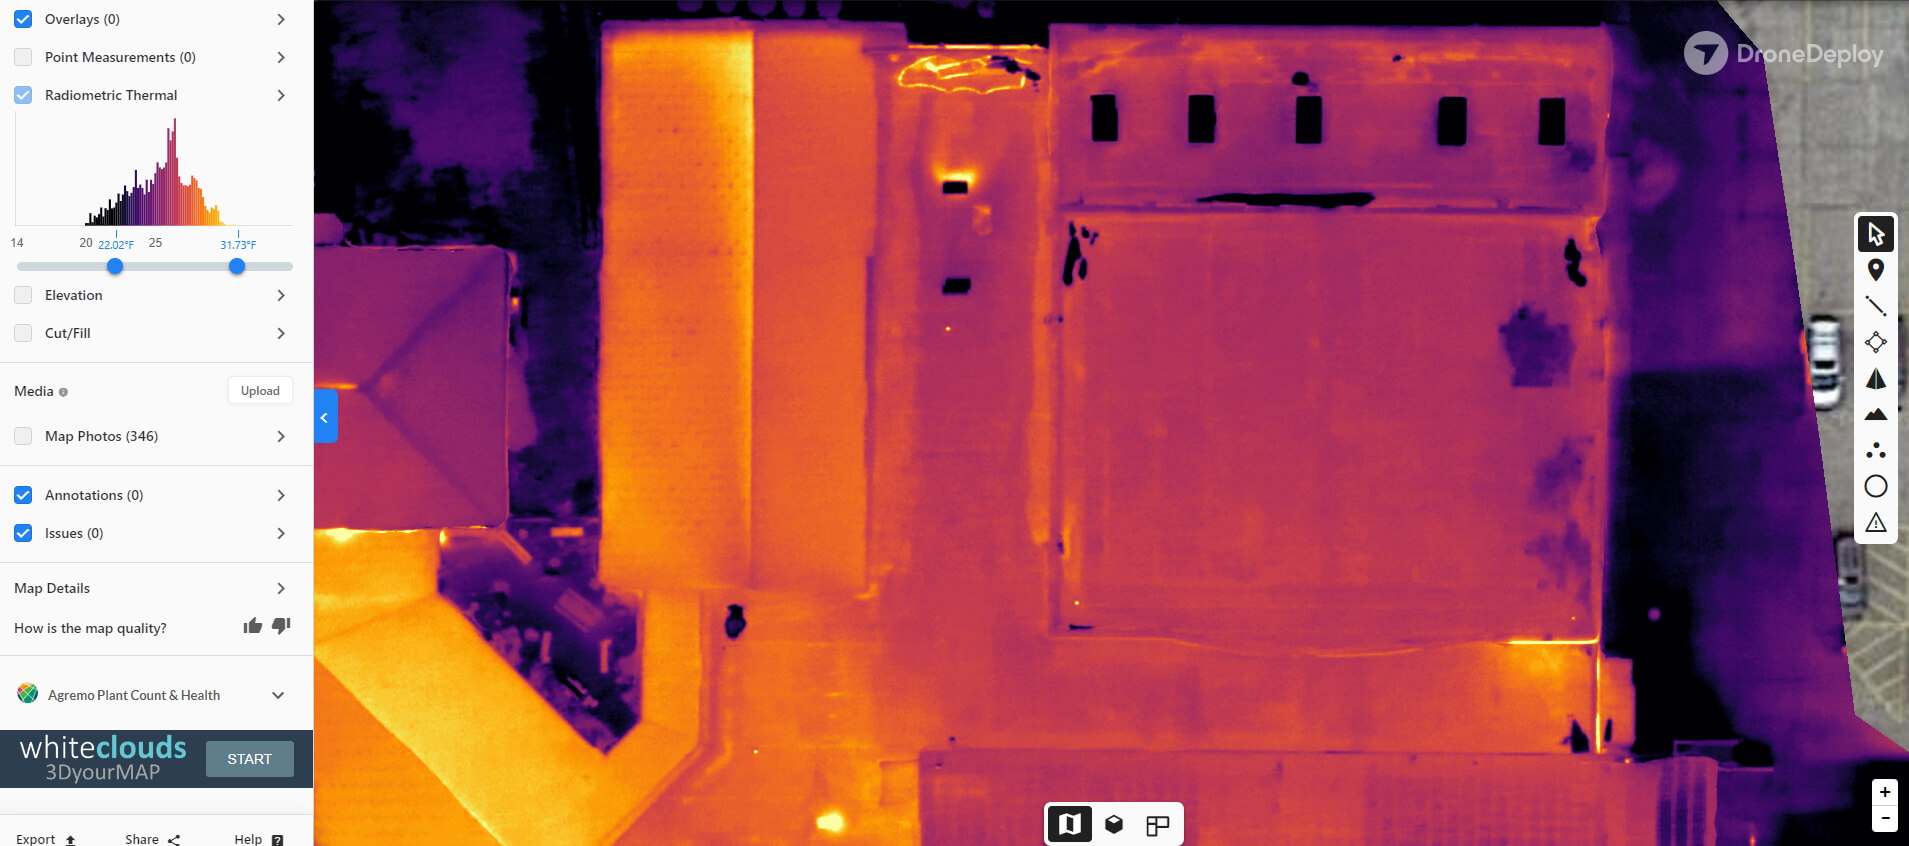
DroneDeploy also has a Radiometric Thermal Analysis Tool that can help determine issues within a thermal map. Just use the histogram on the left side to change the temperature range. They also have a side-by-side tool to help understand the differences between multiple flight dates.
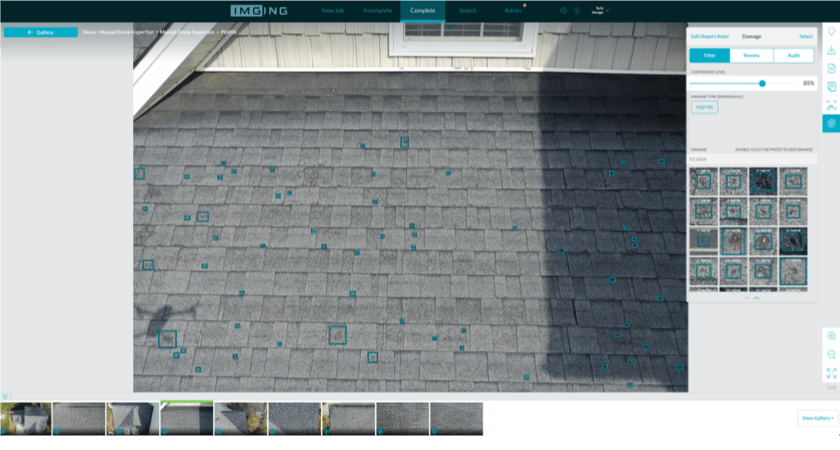
If the goal is focusing more on damage detection, Loveland Innovations and Eagleview are two great options for automated damage detection. They have a number of tools that can detect not just hairline cracks, but also small holes/dimples from hail and tree damage. Take a look below at LoveLand Innovation’s IMGING web tool to analyze the data, along with a sample report page from Eagleview:
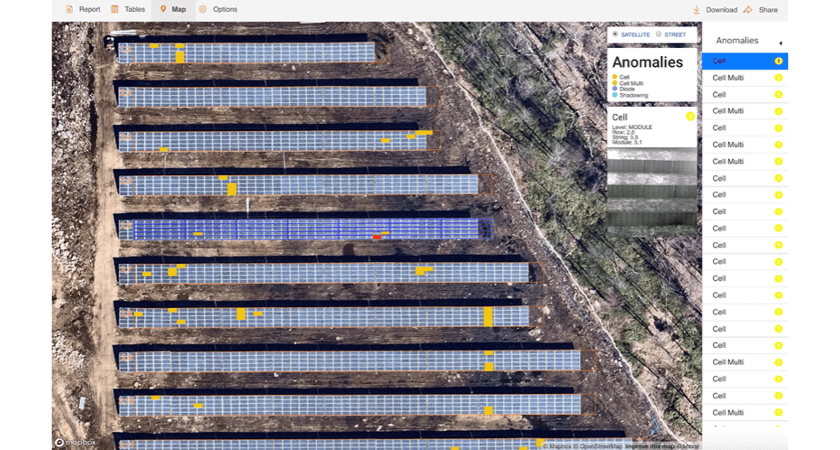
And if the use case is focusing on thermal, Raptor Maps is well known for thermal image analysis. With over 50GW of solar panels analyzed so far, their tools are the go-to for solar panel analysis. See a screenshot from their tool below to understand their solar panel inspections.
Thank You
Thank you for reading this workflow. To learn more about roof inspections, you can check out the article below.


-3.png?width=300&name=Insight%20blog%20featured%20image%201140X660%20(2)-3.png)